Search FAQs
Data Center Expert | Discovering a NetBotz 700 Series Appliance
Issue:
Process to discover a NetBotz 700 series appliance into StruxureWare Data Center Expert.
Product Line
StruxureWare Data Center Expert (DCE)
- Basic Appliance (AP9465)
- Standard Appliance (AP9470)
- Enterprise Appliance (AP9475)
- Virtual Appliance (AP94VMACT)
StruxureWare Central (SWC)
InfraStruXure Central (ISXC)
NetBotz 750 (NBRK0750)
Environment:
StruxureWare Data Center Expert (7.7.1 and higher)
NetBotz 750 (firmware 5.2.0 and higher)
Resolution:
See additional knowledge bases for discovering different other types of devices:
- Video: Data Center Expert | Device Discovery for APC Devices using SNMPv1
- Data Center Expert | Device Discovery for APC Devices using SNMPv3
- Data Center Expert | Discovering a NetBotz 200 Series Appliance
- Data Center Expert | Discovering a NetBotz 300-500 Series Appliance
- Data Center Expert | Discovering a ModbusTCP device
- Video: Data Center Expert | Device Discovery for Third-Party Devices using SNMP
- BACnet is currently not supported
There are multiple steps required to add a NetBotz 700 series appliance into Data Center Expert for SNMP Monitoring and Surveillance (cameras).
Requirements for SNMP Discovery
1) Ensure the NetBotz appliance is accessible on the Network. Instructions on configuring network settings can be found in knowledge base NetBotz 700 Series | Configuring Network Settings .
2) Ensure that you are able to log into an SSH session to the NetBotz 750 using SSH. If you have not yet set the root password, the username will be root and the password will be blank (no value). If a root password has not yet been defined, you will be prompted to define one, which will be used in a later step for communication to DCE. This step MUST be done to perform a discovery.
3) Log into the Web Interface using the username of superuser and password of superuser. You will then be forced to change the password. You can then use this user to fully access the Web Interface.
NOTE: If you choose to create a new user (System menu > Users), you MUST login with that user and change the password for that user before the user will be activated.
4) Log on to the NetBotz Web User Interface and Enable SNMPv1 or SNMPv3: Settings menu > System > SNMP.
Discover NetBotz 700 Series Appliances
1) Go to Device menu > Add devices. Select SNMPv1 or SNMPv3 depending on what version of SNMP setup on the appliance.
2) Specify the IP address or address range, SNMP settings, and whether you want to register for Trap Registration (Priority Scanning).
3) Click on Device File Transfer Settings. Ensure there is an entry for the ROOT (set via the console) credentials of the appliance.
4) Click on NetBotz Appliance Credentials and enter the Web Interface user credentials as set in the requirements section.
NOTE: You must select the port range of 443 when setting or verifying the credentials for use with the 700 series discovery.
5) Click Next, check the box for the device group you wish to discovery into. Click Next.
6) Check the box for Run discovery now and click Finish.
The progress of the discovery can be seen within the Saved Discoveries pane.
7) Once completed, the devices should show within the Device Group you selected. The device WILL have an active alarm on it, "Failed to authenticate with the device API. As a result, the device may fail to show any connected cameras." Follow the steps below to resolve this alarm.
If you are not using Surveillance Cameras on the units discovered, perform these steps.
Add the NetBotz 700 Series SSL Certificate to Data Center Expert
NOTE: You do not need to add the NetBotz Appliance SSL certificate to DCE if you intend to select No verification in the Device > NetBotz Appliance Communication Settings > NetBotz 750 Camera Communication Settings option.
1) Open a web browser and navigate to the NetBotz Appliance web client.
2) Download the certificate from the browser in Base-64 encoded X.509 format.
3) Log in to the Data Center Expert desktop client using an account with administrator privileges.
4) Go to System > Server Administration Settings > Server SSL Certificates.
5) Click Add. Click Import Certificate and then import the NetBotz 750 certificate that was exported in step 2.
6) Click Add.
Add the Data Center Expert SSL Certificate to the NetBotz Appliance
The Data Center Expert SSL certificate must be added to the NetBotz 700 series appliance in order for camera clips and motion updates to be posted to Data Center Expert.
NOTE: If Data Center Expert uses a self-signed certificate, make sure the Verify DCE Certificate In Trust Store option is unchecked on each NetBotz 750 in the Settings > System > DCE Surveillance option. You do not need to upload the Data Center Expert self-signed certificate to the NetBotz 750. Instructions on determining if Data Center Expert uses a self-signed certificate can be found in the Determining if a certificate is self-signed section.
1) Open a web browser and go to the Data Center Expert web client.
2) Follow the same steps for exporting the NetBotz 700 series SSL certificate as listed in the section above, ensuring to use Data Center Experts web interface instead of the NetBotz appliance.
3) Log in to the NetBotz 750 Web client.
4) Go to Settings > System > Trust Store.
5) Click Add.
6) Open the certificate file in a text editor, such as notepad, and copy and paste the certificate into the field.
7) Click Add.
8) Repeat steps 4-8 for each NetBotz 750 you want to discover.
Configure Settings on Data Center Expert
1) Open the Data Center Expert desktop client and log in using an account with administrator privileges.
2) Go to Device menu > SNMP Device Communication Settings > Device File Transfer Settings. Click Add to specify the root credentials (not Web UI) for at least one NetBotz 750. Choose the protocol SCP Only. This allows Data Center Expert to download the device definition file (DDF) from the appliance.
3) Go to Device menu > NetBotz Appliance Communication Settings > NetBotz Appliance Credentials. Click Add to specify the web client user credentials (not root) for the NetBotz 750 appliances you want to discover. If the credentials are different for any of the NetBotz 750 appliance you want to discover, add each appliance to the list individually.
Configure NetBotz 750 Camera Communication Settings in Data Center Expert
If you have imported signed certificates from the NetBotz 750 Appliance, it is not necessary to modify the NetBotz 750 Camera Communication Settings.
If you imported a self-signed certificate from the NetBotz 750 Appliance, and that certificate does not have a valid hostname:
NOTE: Instructions on determining if a certificate is self-signed can be found below in the Determining if a certificate is self-signed section.
1) Go to Device menu > NetBotz Appliance Communication Settings > NetBotz 750 Camera Communication Settings. Select one or more NetBotz 750 IP addresses, and click Edit Communication Settings.
2) Select Verify certificate and click OK.
Additional Resources
Instructions for enabling surveillance for NetBotz cameras in Data Center Expert can be found in knowledge base Video: Data Center Expert | How do I enable surveillance for NetBotz cameras? .
Determining if a certificate is self-signed
1) Within a web browser, load the certificate, as performed above for exporting certificates.
2) Look at the certificate hierarchy or issued by fields to determine if it is a self-signed certificate. The certificate hierarchy will only contain the NetBotz Appliance and the Issued by field will only contain the NetBotz Appliance. If anything else is present, the certificate is not self-signed.
- Google Chrome: Certificate > Certification Path > Certification path.
- Mozilla Firefox: Certificate > Details > Certificate Hierarchy.
- Microsoft Edge: Certificate > Certificate Information > Issued by.
3) Log into the NetBotz 750 web client > Settings menu > About. Ensure that the version listed is at least 5.2.X. Surveillance within Data Center Expert is not supported for the NetBotz 750 until DCE version 7.7.0 and NetBotz firmware version 5.2.X.
- Instructions on upgrading DCE can be found within knowledge base Data Center Expert | Complete Upgrade Process .
- Instructions on upgrading the NetBotz 700 series appliance can be found within knowledge base NetBotz 700 Series | Upgrading Firmware .
Configure settings on the NetBotz Appliance
3) If Data Center Expert uses a self-signed certificate, uncheck the Verify DCE Certificate in Trust Store option in the Settings menu > System > DCE Surveillance option.
4) If Data Center Expert uses a self-signed certificate, uncheck the Verify DCE Certificate In Trust Store option in: Settings > System > DCE Surveillance.
NOTE: If you do not know if Data Center Expert uses a self-signed certificate, see the Determining if a certificate is self-signed section.
Process to discover a NetBotz 700 series appliance into StruxureWare Data Center Expert.
Product Line
StruxureWare Data Center Expert (DCE)
- Basic Appliance (AP9465)
- Standard Appliance (AP9470)
- Enterprise Appliance (AP9475)
- Virtual Appliance (AP94VMACT)
StruxureWare Central (SWC)
InfraStruXure Central (ISXC)
NetBotz 750 (NBRK0750)
Environment:
StruxureWare Data Center Expert (7.7.1 and higher)
NetBotz 750 (firmware 5.2.0 and higher)
Resolution:
See additional knowledge bases for discovering different other types of devices:
- Video: Data Center Expert | Device Discovery for APC Devices using SNMPv1
- Data Center Expert | Device Discovery for APC Devices using SNMPv3
- Data Center Expert | Discovering a NetBotz 200 Series Appliance
- Data Center Expert | Discovering a NetBotz 300-500 Series Appliance
- Data Center Expert | Discovering a ModbusTCP device
- Video: Data Center Expert | Device Discovery for Third-Party Devices using SNMP
- BACnet is currently not supported
There are multiple steps required to add a NetBotz 700 series appliance into Data Center Expert for SNMP Monitoring and Surveillance (cameras).
Requirements for SNMP Discovery
1) Ensure the NetBotz appliance is accessible on the Network. Instructions on configuring network settings can be found in knowledge base NetBotz 700 Series | Configuring Network Settings .
2) Ensure that you are able to log into an SSH session to the NetBotz 750 using SSH. If you have not yet set the root password, the username will be root and the password will be blank (no value). If a root password has not yet been defined, you will be prompted to define one, which will be used in a later step for communication to DCE. This step MUST be done to perform a discovery.
3) Log into the Web Interface using the username of superuser and password of superuser. You will then be forced to change the password. You can then use this user to fully access the Web Interface.
NOTE: If you choose to create a new user (System menu > Users), you MUST login with that user and change the password for that user before the user will be activated.
4) Log on to the NetBotz Web User Interface and Enable SNMPv1 or SNMPv3: Settings menu > System > SNMP.
Discover NetBotz 700 Series Appliances
1) Go to Device menu > Add devices. Select SNMPv1 or SNMPv3 depending on what version of SNMP setup on the appliance.
2) Specify the IP address or address range, SNMP settings, and whether you want to register for Trap Registration (Priority Scanning).
3) Click on Device File Transfer Settings. Ensure there is an entry for the ROOT (set via the console) credentials of the appliance.
4) Click on NetBotz Appliance Credentials and enter the Web Interface user credentials as set in the requirements section.
NOTE: You must select the port range of 443 when setting or verifying the credentials for use with the 700 series discovery.
5) Click Next, check the box for the device group you wish to discovery into. Click Next.
6) Check the box for Run discovery now and click Finish.
The progress of the discovery can be seen within the Saved Discoveries pane.
7) Once completed, the devices should show within the Device Group you selected. The device WILL have an active alarm on it, "Failed to authenticate with the device API. As a result, the device may fail to show any connected cameras." Follow the steps below to resolve this alarm.
If you are not using Surveillance Cameras on the units discovered, perform these steps.
Add the NetBotz 700 Series SSL Certificate to Data Center Expert
NOTE: You do not need to add the NetBotz Appliance SSL certificate to DCE if you intend to select No verification in the Device > NetBotz Appliance Communication Settings > NetBotz 750 Camera Communication Settings option.
1) Open a web browser and navigate to the NetBotz Appliance web client.
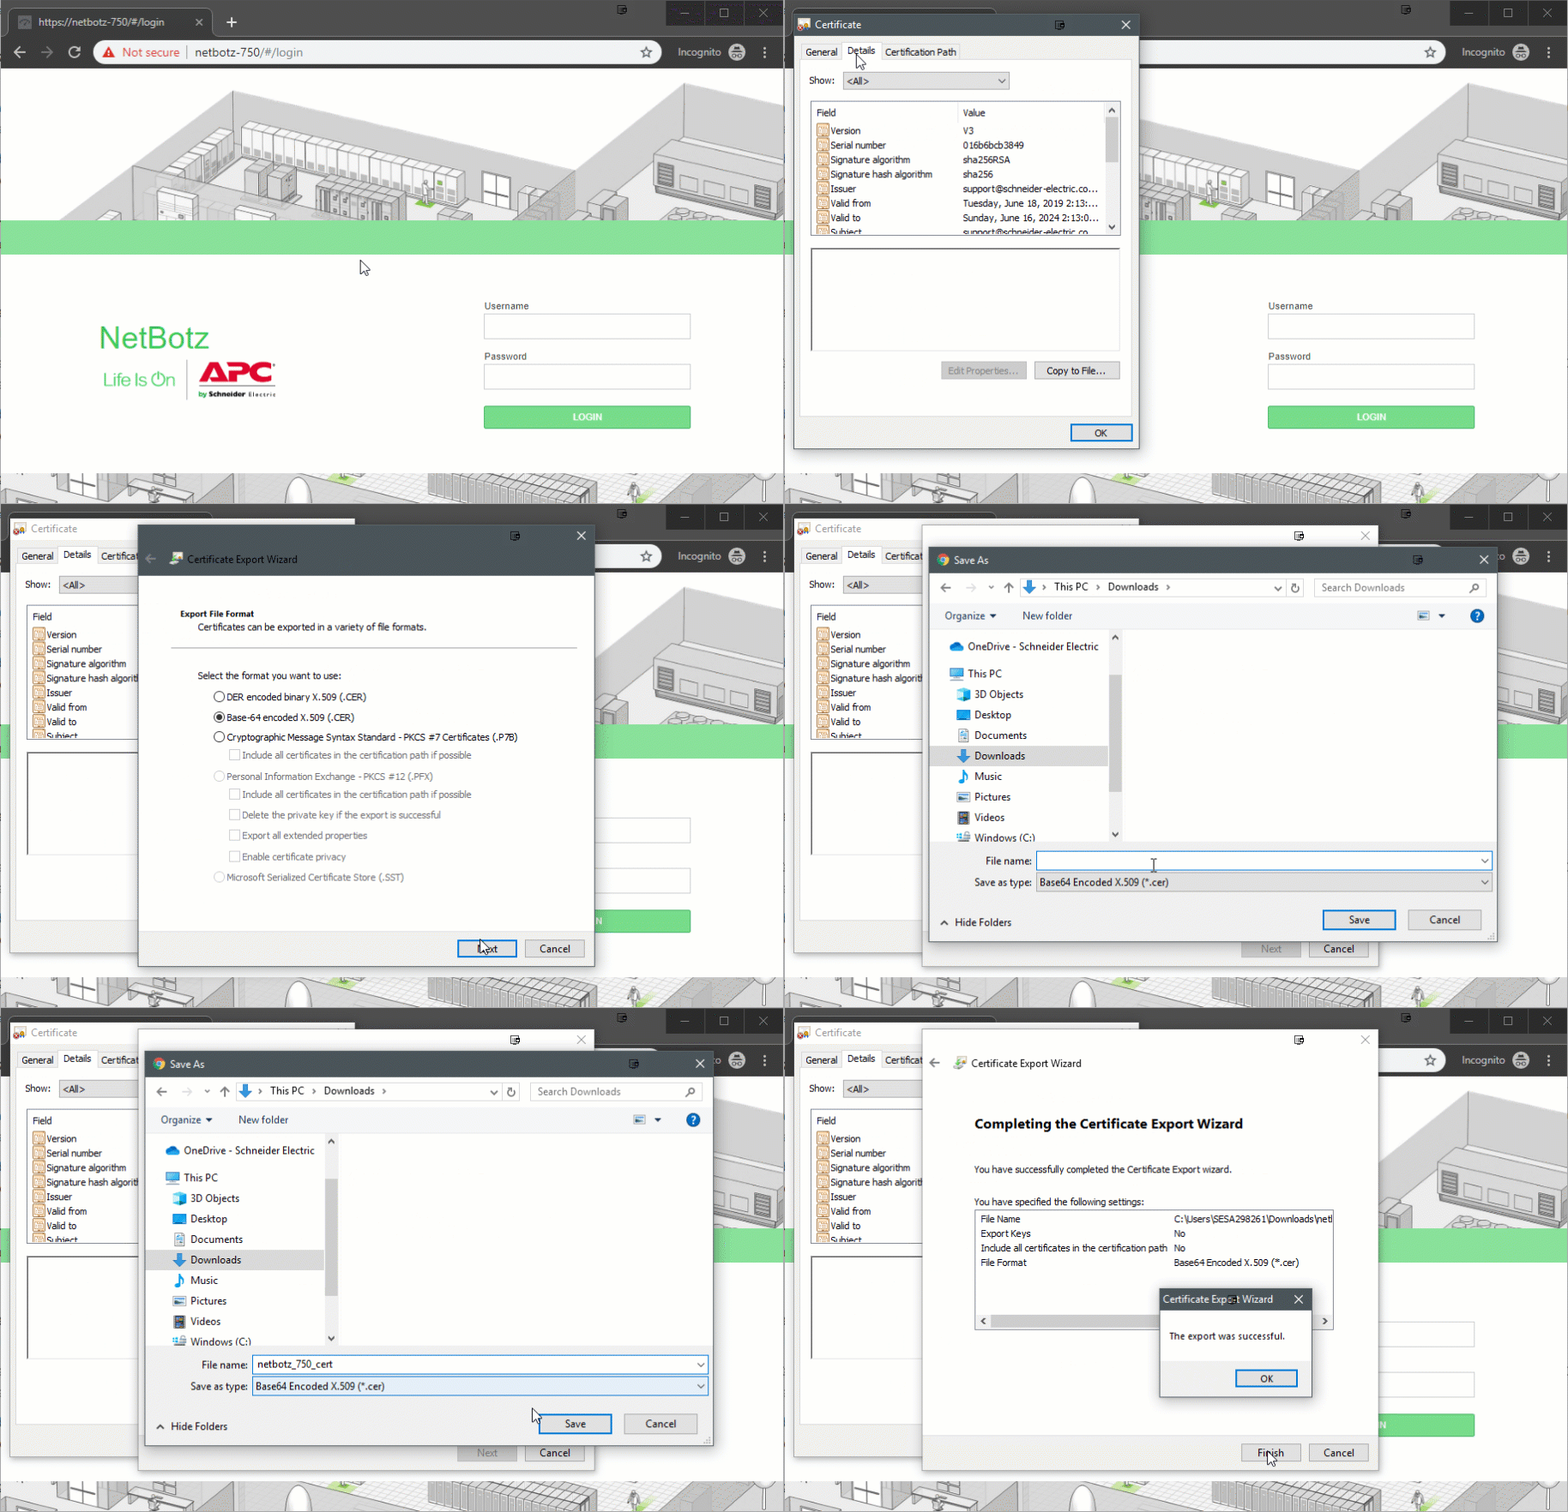
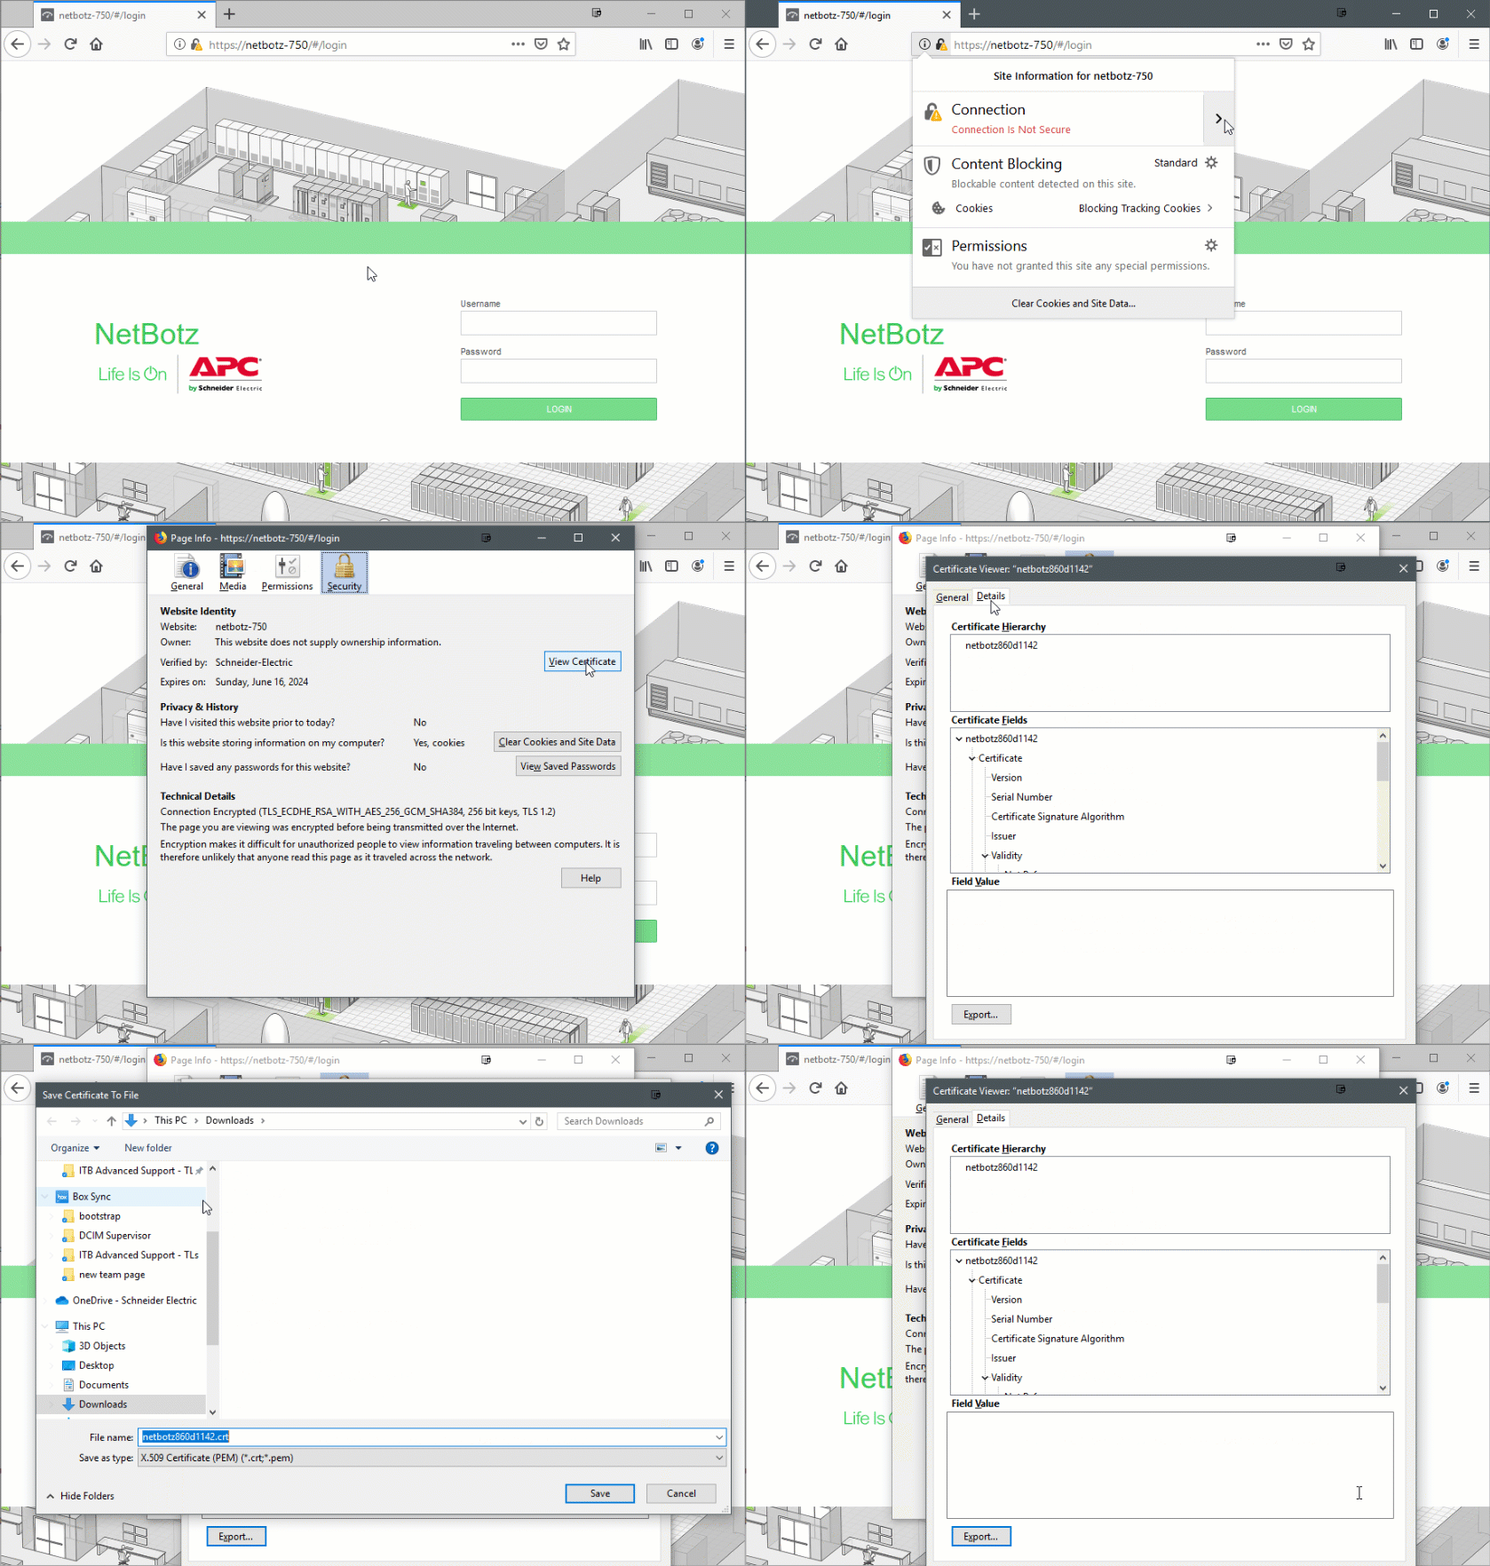
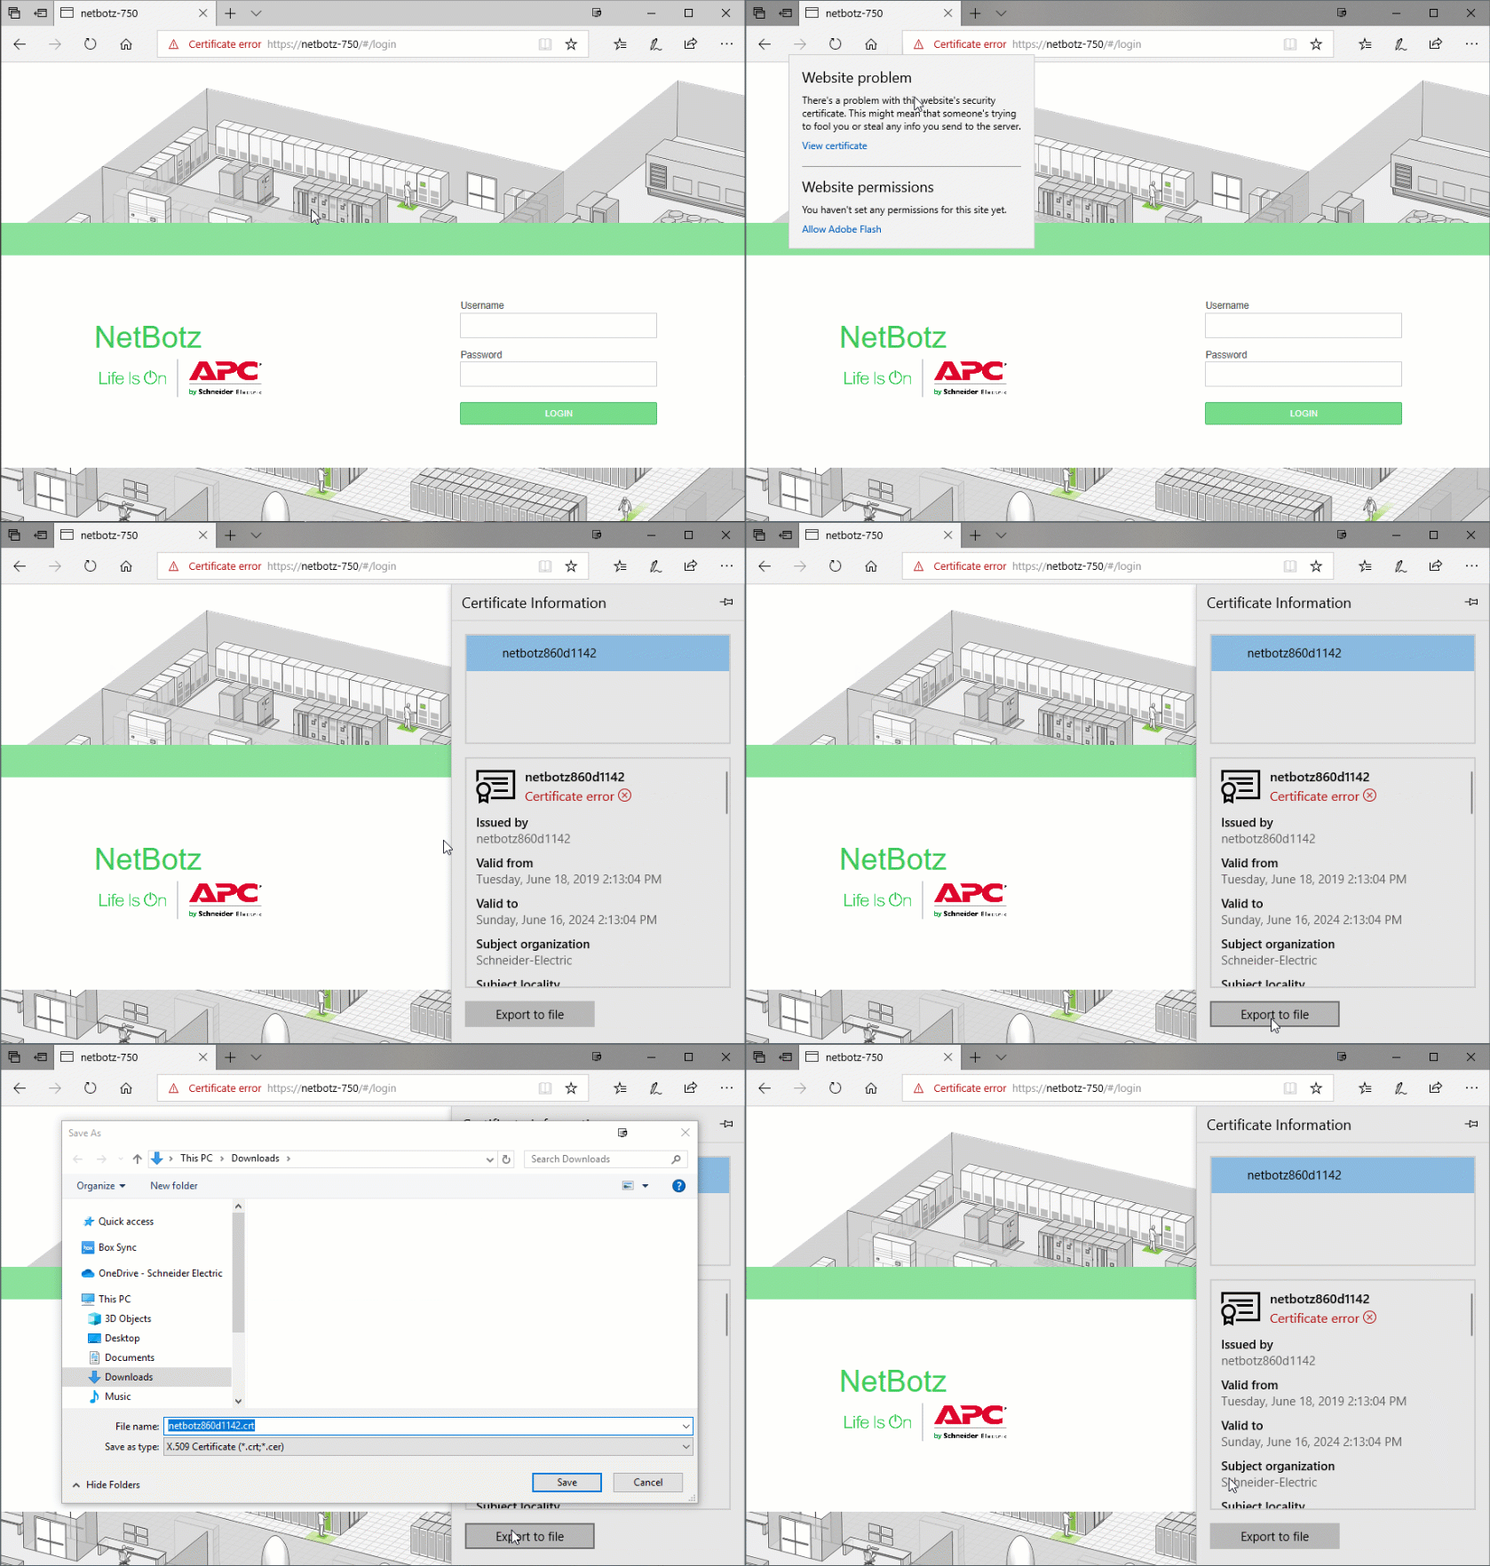
2) Download the certificate from the browser in Base-64 encoded X.509 format.
Google Chrome:

Mozilla Firefox:

Mozilla Firefox:
Microsoft Edge:
3) Log in to the Data Center Expert desktop client using an account with administrator privileges.
4) Go to System > Server Administration Settings > Server SSL Certificates.
5) Click Add. Click Import Certificate and then import the NetBotz 750 certificate that was exported in step 2.
6) Click Add.
Add the Data Center Expert SSL Certificate to the NetBotz Appliance
The Data Center Expert SSL certificate must be added to the NetBotz 700 series appliance in order for camera clips and motion updates to be posted to Data Center Expert.
NOTE: If Data Center Expert uses a self-signed certificate, make sure the Verify DCE Certificate In Trust Store option is unchecked on each NetBotz 750 in the Settings > System > DCE Surveillance option. You do not need to upload the Data Center Expert self-signed certificate to the NetBotz 750. Instructions on determining if Data Center Expert uses a self-signed certificate can be found in the Determining if a certificate is self-signed section.
1) Open a web browser and go to the Data Center Expert web client.
2) Follow the same steps for exporting the NetBotz 700 series SSL certificate as listed in the section above, ensuring to use Data Center Experts web interface instead of the NetBotz appliance.
3) Log in to the NetBotz 750 Web client.
4) Go to Settings > System > Trust Store.
5) Click Add.
6) Open the certificate file in a text editor, such as notepad, and copy and paste the certificate into the field.
7) Click Add.
8) Repeat steps 4-8 for each NetBotz 750 you want to discover.
Configure Settings on Data Center Expert
1) Open the Data Center Expert desktop client and log in using an account with administrator privileges.
2) Go to Device menu > SNMP Device Communication Settings > Device File Transfer Settings. Click Add to specify the root credentials (not Web UI) for at least one NetBotz 750. Choose the protocol SCP Only. This allows Data Center Expert to download the device definition file (DDF) from the appliance.
3) Go to Device menu > NetBotz Appliance Communication Settings > NetBotz Appliance Credentials. Click Add to specify the web client user credentials (not root) for the NetBotz 750 appliances you want to discover. If the credentials are different for any of the NetBotz 750 appliance you want to discover, add each appliance to the list individually.
Configure NetBotz 750 Camera Communication Settings in Data Center Expert
If you have imported signed certificates from the NetBotz 750 Appliance, it is not necessary to modify the NetBotz 750 Camera Communication Settings.
If you imported a self-signed certificate from the NetBotz 750 Appliance, and that certificate does not have a valid hostname:
NOTE: Instructions on determining if a certificate is self-signed can be found below in the Determining if a certificate is self-signed section.
1) Go to Device menu > NetBotz Appliance Communication Settings > NetBotz 750 Camera Communication Settings. Select one or more NetBotz 750 IP addresses, and click Edit Communication Settings.
2) Select Verify certificate and click OK.
Additional Resources
Instructions for enabling surveillance for NetBotz cameras in Data Center Expert can be found in knowledge base Video: Data Center Expert | How do I enable surveillance for NetBotz cameras? .
Determining if a certificate is self-signed
1) Within a web browser, load the certificate, as performed above for exporting certificates.
2) Look at the certificate hierarchy or issued by fields to determine if it is a self-signed certificate. The certificate hierarchy will only contain the NetBotz Appliance and the Issued by field will only contain the NetBotz Appliance. If anything else is present, the certificate is not self-signed.
- Google Chrome: Certificate > Certification Path > Certification path.
- Mozilla Firefox: Certificate > Details > Certificate Hierarchy.
- Microsoft Edge: Certificate > Certificate Information > Issued by.
3) Log into the NetBotz 750 web client > Settings menu > About. Ensure that the version listed is at least 5.2.X. Surveillance within Data Center Expert is not supported for the NetBotz 750 until DCE version 7.7.0 and NetBotz firmware version 5.2.X.
- Instructions on upgrading DCE can be found within knowledge base Data Center Expert | Complete Upgrade Process .
- Instructions on upgrading the NetBotz 700 series appliance can be found within knowledge base NetBotz 700 Series | Upgrading Firmware .
Configure settings on the NetBotz Appliance
3) If Data Center Expert uses a self-signed certificate, uncheck the Verify DCE Certificate in Trust Store option in the Settings menu > System > DCE Surveillance option.
4) If Data Center Expert uses a self-signed certificate, uncheck the Verify DCE Certificate In Trust Store option in: Settings > System > DCE Surveillance.
NOTE: If you do not know if Data Center Expert uses a self-signed certificate, see the Determining if a certificate is self-signed section.
Released for:APC USA
Explore more
Range:
Explore more
Range:

